Introduction
This reference guide is meant to be an indexed document for quickly finding information about the Untangled Web Framework. If you’re trying to learn Untangled, then you should do the tutorial.
Basic UI
Untangled uses Om, which in turn uses React underneath.
Creating a Custom React Class
The mechanism for creating components is the defui macro:
(defui ComponentClassName
  Object
  (componentWillUpdate [this nextprops nextstate] (println "Component will update"))
  (render [this]
    (dom/div nil "Hello world")))
This macro generates a React class as a plain JavaScript class, so it is completely compatible with the React ecosystem.
Notice the use of Object. It indicates that the following method bodies (like in
protocols) are being added to the
generated class. From an OO perspective, this is like saying \"my widget extends Object\". The render
method is the only method you need, but you can also add in your own methods or React lifecycle
methods.
React lifecycle methods
If you wish to provide lifecycle methods, you can define them under the Object section of the UI:
(defui WidgetWithHook
  Object
  (componentWillUpdate [this nextprops nextstate] (println "Component will update"))
  (render [this]
    (dom/div nil "Hello world")))
Lifecycle method signatures
For reference these are the signatures you should use for the React Lifecycle methods:
(initLocalState [this])
(componentWillReceiveProps [this next-props])
(componentWillUpdate [this next-props next-state])
(componentDidUpdate [this prev-props prev-state])
(componentWillMount [this])
(componentDidMount [this])
(componentWillUnmount [this])
ClojureScript and React – HTML differences
Here are some common things you’ll want to know how to do that are different when rendering with Om/ClojureScript:
-
Inline styles are specified with real maps
(dom/p #js { :style #js {:backgroundColor \"rgb(120,33,41)\"} } …). Note the nested use of raw Javascript maps. These are passed directly to React. Using cljs persistent data structures won’t work. -
CSS class names are specified with
:classNameinstead of:class. -
Any time there are adjacent elements of the same type in the DOM, they should each have a unique
:keyattribute. This is typically generated by a function you supply to the Om factory function, but you can also do it manually.
Element factory
In order to render components on the screen you need an element factory.
You generate a factory with om/factory, which will then
act like a new 'tag' for your DOM. We commonly prefix these factories with ui- so
we don’t confuse them with query attribute names and other local bindings. If the
component is ever to be rendered in a list of adjacent elements then the factory should
be given a key function for generating unique React keys on the component.
(def ui-widget (om/factory Widget {:keyfn (fn [props] (get props :some-prop))}))Rendering a Component, Sending, and Accessing Properties
You can now render a widget inside of any other component using (ui-widget { :prop 1 }).
You access properties in a component using om/props:"
(defui Widget
  Object
  (render [this]
    (let [{:keys [name]} (om/props this)]
      (dom/div nil (str "Hello " name)))))

(def ui-widget (om/factory Widget))

...
   (ui-widget {:name "Sally"})
Computed data like Callbacks
In plain React you store component local state and pass data from the parent to the child through props. You also pass your callbacks through props. In Untangled, we need a slight variation of this because a component can have a query that asks the underlying system for data.
If you complect callbacks and such with this queried data then you run into trouble because the rendering system can re-render a component without going through the parent, meaning that callbacks could be lost.
So, in general props are for passing data that the component requested from a query.
As such, Om has an additional mechanism for passing things that were not specifically asked for in a query: Computed properties.
For your Om UI to function properly you must attach computed properties to props via the helper function om/computed.
The child can look for these computed properties using om/get-computed.
Stateful components
Earlier we stress that your components should be stateless whenever possible. There are a few notable exceptions that we have found useful (or even necessary):
-
The Untangled support viewer shows each app state change. User input (each letter they type) can be quite tedious to watch in a support viewer. Moving these kinds of interstitial form interactions into local component state causes little harm, and greatly enhances support. Om automatically hooks up local state to input fields when you use "uncontrolled" form elements (which means you didn’t set value/checked).
-
External library integration. We use stateful components like D3 visualizations.
Form inputs
Om already hooks local state to form elements. So, in fact, you have to override this to not use component local state. For text controls we’d recommend you leave it this way. For other controls like checkboxes it is probably best to override this.
External library state
See the D3 example in the Untangled Tutorial.
Built-in React DOM
All of the standard HTML tags have pre-built React components, accessible from the om.dom namespace.
(ns ui
  (:require [om.dom :as dom]))

(defui Widget
  Object
  (render [this]
    (dom/div nil (str "Hello " name))))
Application Database Format
Untangled applications use the default Om database format. This is a simple graph database format made from standard Clojurescript persistent data structures: Maps and vectors. The entire database is a map.
Tables
Specific items in the database are stored in tables. Each table is indexed by a top-level key in the database. Items in the database can refer to other items via a foreign reference, which is formatted as an Ident. It is also legal to have top-level data that is not a table.
{:value 53
 :table/by-id { 1 { :id 1 :x 1 } } }
The only way to tell a table from a value is by convention. Tables will usually be named in a way that
indicates what the primary key of the table is (e.g. by-id), and will be maps of maps. Regular values can
be anything, including an Ident.
Idents
An Ident is nothing more than a two element vector, where the first entry is a keyword (the "name" of a database table)
and the second entry is the ID of the object in that table: [:table-name id]
In the database above you would describe the object in the table as [:table/by-id 1].
Graph
Combining regular values, tables, and idents gives you the overall database format which can support any arbitrary graph. The database below has a list of two people (via idents pointing to the people in the table), and each person has a pointer to the person that is their mate. This creates a graph with a loop (when following mate).
{:my-list [ [:people/by-id 1] [:people/by-id 2] ]
 :people/by-id {
   1 { :db/id 1 :person/name "Tony" :person/mate [:people/by-id 2]}
   2 { :db/id 2 :person/name "Jill" :person/mate [:people/by-id 1]}}}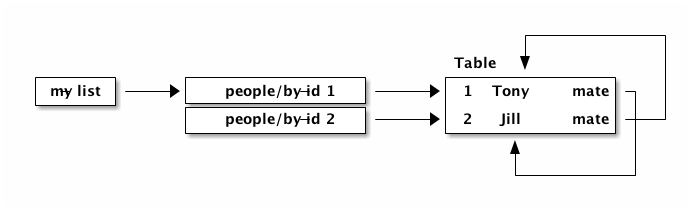
The Query Language
The query language is a subset of Datomic Pull syntax. It is a syntax that is designed to walk a graph and produce a tree (which is suitable for a UI, which is naturally a tree).
Queries are written as a vector.
Attributes
The query [:a :b :c] means read the attributes :a :b, and :c from the current object. For example,
if this query was against the root of the graph, it would mean the top-level database itself should contain the
keys :a, :b, and :c. In the context of a join (or sequence of joins) it indicates attribute reads in that
context.
One may query any attribute that makes sense, including an entire table. For example, the query [:people/by-id]
against the database above will return:
{ :people/by-id { 1 { :db/id 1 :person/name "Tony" :person/mate [:people/by-id 2]}
                  2 { :db/id 2 :person/name "Jill" :person/mate [:people/by-id 1]}}}
Joins
Joins can be done against reference typed attributes (which essentially means an attribute holding an ident).
Joins are written as a map, where the key is the join point, and the value is a sub-query: [{:my-list [:person/name]}]. If
the join point is a vector of idents, then it is a to-many join and the query will result in multiple values. If
the join point is a single ident, then it is a to-one join, and the query will result in a single value. In the
context of our database above this query should return the names of the people in my list.
The join shown in the prior paragraph against our database above would result in:
{ :my-list [ {:person/name "Tony"} {:person/name "Jill"} ] }Recursion
Queries can be recursive. In the case where the graph has a normal termination point (such as bullet lists) you
can use … to indicate a recursive join: [{:list [:item/name {:sublist …}]}]
This would return a nested map that would follow the graph database links and possibly return something like this:
{ :list { :item/name "A"
          :sublist [ { :item/name "A.1" }
                     { :item/name "A.1" :sublist [ { :item/name "A.1.1" } ]}]}}
In our database from earlier, we have a loop. The query engine will automatically detect loops and stop, but you can manually
limit the recusion depth using a number instead of …: [{:my-list [:person/name {:person/mate 1}]}]
which would result in:
{ :my-list [ { :person/name "Tony" :person/mate { :person/name "Jill" } }
             { :person/name "Jill" :person/mate { :person/name "Tony" } } ]}
Unions
Union queries are used strictly as the subquery on joins, and are represented by a map. The keys of the map represent the possible choices of subquery to run, and the value represents the subquery.
In the case of a union query one must realize that it is impossible to say what the query means until you look at the actual database. Here is how they work:
-
Examine the Ident at the join point of the join. Extract the keyword from that ident.
-
Use the ident from (1) to look up the subquery from the union.
-
Continue processing the query using that subquery
Union Example
Assume the following simple database:
{ :things [ [:people/by-id 1] [:animals/by-id 1] ]
  :people/by-id { 1 { :id 1 :type :person :name "Joe" } }
  :animals/by-id { 1 { :id 1 :type :dog :breed "Poodle" } } }
The following query: [{:things { :people/by-id [:type :name]
:animals/by-id [:type :breed] }}]
would see the to-many join of :things, and for each element it would select the proper subquery. Resulting in:
[ { :type :person :name "Joe" }
  { :type :dog :breed "Poodle" } ]
Unions work fine on to-one joins exactly the same (returning only one result).
Query parameters
The query language includes support for adding a parameter map to every kind of query element. Untangled does not support such parameters on the UI; however, since the same query language is used with respect to the server, it is useful to know how to represent them.
Basically, you surround the query element with parens, and add a map as the second entry.
A property with a parameter: [(:prop { :param 1})]
A join with a parameter: [({:prop [:a :b]} { :param 1})]
Again, the the UI cannot make sense of these, but you can write such queries to the server and interpret them there.
Initial Application State
Building your initial application state can be done in one of three ways. The recommended approach is to co-locate the application state on the components that will use it. You may also hand-build either a tree (which can be auto-normalized by the UI components into a graph). Finally, you may hand-build a graph database in the format described earlier.
All three methods should result in a graph database. They are just different approaches at initial input, with different pros/cons.
In all cases you must ensure that the components have Ident implementations that match up with your graph structure.
Using InitialAppState
This is probably the easiest method to code, and the easiest to keep straight during development because the data is co-located with the queries and UI bits. The only disadvantage is that you cannot easily initialize parts of the graph that do not have a UI representation (which is probably rare).
Implement the InitialAppState protocol on your ui components, and compose the initial state together just like you
do with queries:
(defui Child
  static uc/InitialAppState
  (initial-state [clz params] { :a 1 })
  ...)

(defui Parent
  static uc/InitialAppState
  (initial-state [clz params] { :x 1 :child (uc/initial-state Child) })
  ...)
Compose these all the way to your root component. Untangled will detect state on your root component, and use that to construct the initial application database.
Unions and InitialAppState
To-one unions (e.g. used in tabbed interfaces) are automatically resolved if the branches of the union all define InitialAppState implementations. The union component InitialAppState should define the "default" branch of the union.
Using a manually-constructed graph db
Simply create your database in a map, then wrap it in an atom and pass that via the :initial-state parameter of
new-untangled-client. This method is a bit of a hassle to maintain, but allows you to place things in the database
that are not (yet) in your UI.
Using a manually-constructed tree
Create a tree of data in a map. Pass it (not wrapped in an atom) to :initial-state. This technique is probably the
least useful. It is no more functional than the InitialAppState method, but is harder to maintain.
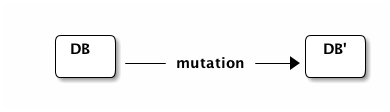
Mutations
Untangled uses the abstract top-level transactions modelled by Om to evolve your application state. One should view mutations as a function that evolves the state of the database:
Remember that almost everything in your database should be in a table. Mutations run in the context of components (or
can take parameters), which means that mutations can be given sufficient context (e.g. an ident of the thing to change)
to be fully abstract. An operation like set-date-to-todate might take the ident of a calendar widget. It need only
go to that place in the database and change the state there.
Built-in mutations
The following functions are built in (in untangled.client.mutations), and should generally only be used in the context of UI state changes (e.g.
folding, checkbox toggle, etc.). They invoke an internal transaction.
|
Warning
|
You should not use these for bit-twiddling your real state! Define your own top-level abstract transactions. These functions are really meant as convenience when dealing with controlled form inputs whose state is in your app state. |
-
(set-string! component field [event|value]) -
(set-integer! field [event|value]) -
(set-value! component field value) -
(toggle! component field)
The first two take a value or event via a named parameter. For example (m/set-string! this :name :event evt) where
evt is a javascript input field event will extra the input’s value and store it in the app db on the correct table
entry. These functions are really meant for working with form field state stored in the app database (as opposed to
component local state in uncontrolled form inputs).
Custom mutations
Untangled provides a multimethod that you can hook your own mutations into.
(ns app.mutations
  (:require [untangled.client.mutations :as m]))

(defmethod m/mutate 'my/mutation-symbol [env k params]
   { :action (fn[] ...) })
The three parameters are:
-
env: The mutation environment. This is a map that contains: —state: The current app database atom. Useswap!to modify it —ref: The ident of the component that invoked the transaction -
k: This is the symbol, which is identical to the multimethod dispatch value (generally ignored) -
params: The parameters passed to the mutation
|
Warning
|
The body should not side-effect! It should instead return a map. The map can contain: |
-
:action: A lambda function to run that will actually do the side-effects -
One or more remote indicators. Typically something like
:remote true. See the section on remote mutations.
Invoking a mutation (transact!)
The om/transact! function is used to run a top-level transaction, and can invoke any number of mutations (in order).
It must be given a component reference or reconciler (typically the former) and a transaction to run. This looks just
like the query notation, but looks to include method calls (which will invoke the multimetod by symbol):
(om/transact! this '[(my/mutation-symbol {:x 1}) (other/mutations)])The mutations in a transaction will run in order. Any of them that indicate a remote nature will be sent across the wire to the server.
Post mutation hooks (experimental)
The is a multimethod for adding in post-mutation handlers that will run after the main mutation. These can be useful when there is a common behavior that should happen after some set of mutations.
UI refresh after mutation
Untangled uses Om to manage the UI, and as such the UI refresh story is Om’s story. The basic
rule is that when you transact!, the component (subtree) used for the transaction will be refreshed in the UI. This
allows you to automatically handle a lot of UI updates without having to think much; however, there are a couple of
general rules and tools you can use when this alone is insufficient.
-
Move the transaction to a parent, and pass a callback that invokes (the parent’s) transaction in the child. This technique composes well (the parent has to know about the child, but the child need only support the abstract idea of providing a callback hook). This is the most common technique in list management, where a child might have a delete button, but the delete really needs to happen on the parent’s list.
-
Use follow-in reads
Follow-on Reads
The name "follow-on reads" is meant to describe the abstract way of refreshing the UI without thinking specifically
about the UI. A follow-on read is a way to indicate what (typically derived) data should be re-read from your
application database after a mutation. For example, if you have a friend list and you add someone to it, you might
need to re-read the count of friends for some indicator somewhere else on the screen. It is easy to reason about
the concept that the mutation add-friend affects the database value :friend-count (which you can explicitly store
as a denormalized value after each mutation, or derive in the UI by pulling in the list of friends and counting them).
Independent of how you store data in your database, you know what you’ve changed in a mutation. So, when you run a mutation you can indicate that you’d like the parts of the UI that ask for those other bits of data to refresh.
Untangled Server and Full Stack Integration
The Untangled server library provides a full-stack development experience for Untangled Web applications. When combined with the client library, you get a number of base features that are useful for most applications:
-
An easy-to-use pluggable architecture for adding in databases and other components
-
A clear way to add read/write semantics for handling Untangled queries and mutations
-
Processing pipeline hooks for pre-processing, post-processing, and non-API routes (e.g. file serving)
-
General data compression and file resource cache headers
The overall network plumbing of Untangled includes a number of additional features that assist with some common patterns needed by most applications:
-
JSON+Transit for API encoding
-
The ability to elide UI-only bits of query when using a general UI query against a server
-
A clean story for app-state merging that includes attribute "stomping" semantics
-
Clear network communication ordering to prevent out-of-order execution reasoning
-
The ability to send queries in parallel when sequential reads are not necessary for clear reasoning (parallel loading)
Overall Network Plumbing
There are a number of convenient things that the network stack does automatically, as shown in the diagram below:
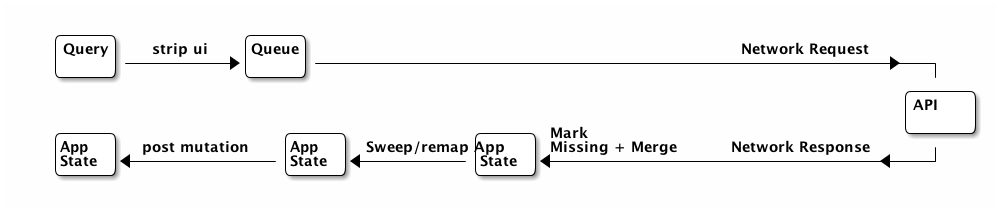
- Strip UI
-
This stage removes any attributes in the query that are namespaced to
ui. For example,:ui/checked. This allows you to place attributes on a UI component that use the app database for storage (and then query for them) while still being able to easily use that component’s query as part of a server query. - Queue
-
All queries are placed on a queue, and are processed one-at-a-time. There is an option to do queries in parallel and bypass this queue.
- API
-
This is the server-side API you write to process the query.
- Mark missing/Merge
-
This is the first stage of the client response processing. During this phase the query and response are walked. If the response does not contain a value for an attribute that was in the query, then a special
not-foundvalue is added to the incoming response. This composite value is then deep merged with the application state. This forces anything that has "disappeared" from the server to be marked asnot-foundin the app database. - Sweep
-
This post-processing stage walks the app database and removes anything that has a value of
not-found. This is the second half of the mark/sweep of data that has disappeared from the server. - Remap
-
If the request was a mutation (instead of a query), then the response may contain tempid remaps. This step walks the app database replacing IDs that have been remapped.
- Post Mutation
-
The client API for network queries allows for a user-defined post mutation to run at the end of the chain. This is used to create or update alternate UI views of the recently loaded data, if necessary.
Implementing server queries
The server-side queries come in a the full EDN send from the client. The Untangled Server code automatically decodes this query and passes it to an Om parser that you define. The basics of processing these queries are covered in the tutorial.
The primary thing to remember is that server query processing functions (which run inside of a parser)
should return a map whose only key is :value and whose value is the value for that query attribute/fragment.
Initial Data Loading
Initial data loading can be done in the client by adding a started-callback parameter to the construction of the
client. One or more calls to load-data can be used to queue up initial reads from your server, and each of those
loads can specify :parallel true to indicate that the loads are not order dependent (if that is indeed true).
On-demand Loading
Any event (timeout, user interaction, etc) can be used to trigger additional loads. The typical calls used for this
are load-data and load-field. The former is completely general and allows for an arbitrary query. The latter is
component-centric, and can be used to auto-construct a server query based on the component’s ident, fields, and subqueries.
There are a number of examples in the Untangled Cookbook.
Implementing server mutations
Server mutations are coded exactly like client mutations, but their body does whatever server-side operations you care to do (instead of mutating a client-focused UI database).
There are a few things to understand when implementing a mutation:
-
You must return a map whose main key is
:actionand whose value is a function that will accomplish the change -
The function should return a map. If any data came into the mutation from the client as a temporary ID, then the map should contain the key
:tempidswhose value is a map from the incoming tempid to the newly assigned permanent ID.
Server reads (after mutation)
You may add a server read to a transaction that also contains a mutation. In this case the mutations and reads will be split,
the mutations will run, then the reads will run (ordered using the network queue). Server reads take the form of an
untangled/load built-in client mutation. See the getting started video about
server basics at roughly 25:20
Loading markers
When an item reaches the tip of networking queue and is pulled off Untangled will replace (unless told not to) the data being loaded with a marker that the UI can use to show an alternate representation (e.g. a spinner in place of a table). There is also a global loading marker at the top of the application state.
Loading markers are covered in this getting started video and the Untangled Cookbook recipe about lazy loading visual indicators.
Out-of-band Data (websocket, timeout, XHR)
When using things like websocket server push, timeouts, and manual XHR requests you may have data that you’d like to
place in your application’s state that does not arrive through the normal Untangled processing pipeline. In these cases
you may use Om’s merge! function or Untangled’s merge-state!. The latter does a bit of common work for you if you
can structure the data in a way that looks like the response to an existing query of a UI component with an ident.
Basically, you structure the data to be a tree of maps that could exist in the database for a given component (and
children). The merge-state! function will extract the ident from that data, normalize the tree into objects, and
merge everything into tables.
Any number of named parameters can be given at the same time to add that object’s ident to other locations in the database.
See the docstring of merge-state! and integrate-ident! in the untangled.client.core namespace.
Handling network errors
There are several different kinds of errors that can happen when working with a full-stack application:
-
Hard network errors (e.g. lost WiFi, server crashed)
-
Unexpected server errors (code threw an unexpected exception)
-
API errors (client made a bad request, server state is out of sync with client, etc.)
Untangled gives you a few mechanisms for dealing with full-stack errors:
-
A global handler that can be set when you create a client (see
:network-error-callbackinnew-untangled-client). This is only available if you use the default network implementation. This function will also be called on server exceptions, since the default server implementation sends back a hard error. -
Fallbacks: A fallback is a placeholder in mutations that is called if the mutation transaction fails. It can modify the app state in any way it sees fit to represent the handling of the error (e.g. change UI state to show an error dialog, reload the page, etc.).
Untangled Spec
Untangled Spec is built on Clojure/Clojurescript test. The entire API of those libraries works within the body of the specification. Untangled spec adds in a few useful features:
-
A DSL that reads more like an outline of a runnable specification
-
Clojure and Clojurescript test runners that render the specification results as an outline
-
Easy mocking with script-like semantics, argument capture and verification, and async timeline simulation
-
Midje-like assertion blocks
Specification Layout
Assertions and arrows
Mocking
-
Verify is automatic (use =2x⇒ to indicate an exact number of runs, where 2 can be any number)
-
Left hand side is capture, right hand side can have assertions
Mention gotchas:
-
Cannot mock inline or macros
-
Mocking internals of Om can cause the browser-based spec renderer to fail. Recommend not doing it.
Untangled Datomic
The Untangled Datomic library includes a few useful additions that make it easier to integrate one or more Datomic databases as persistent storage:
-
A configurable database component
-
Schema and migration support
-
Experimental schema rule enforcement for additional referential integrity checks
Injecting and configuring database(s)
Schema support
The schema support in Untangled Datomic is a fork of Yuppiechef’s Datomic Schema with additions for experimental additional schema enforcements.
Migrations
Validated transactions (EXPERIMENTAL)
The library comes with a function called vtransact. It works just like Datomic’s transact, but enforces the additional
schema constraints. This function should be considered experimental. We’d be interested in feedback.
Websockets
The Untangled Websockets library gives you an alternate network implementation (for client and server) that maintains a persistent TCP connection and enables server push. Note that the server continues to support the non-websocket API endpoint, which is useful if you want to have multiple client types supported by the same server.
Internationalization
Untangled client comes with tools to enable full internationalization based on GNU gettext. The main features include:
-
Use your native language (e.g. English) as the real strings in the UI. These will also act as the default values should a translation be missing
-
Support for date, time, numeric, and plural formatting.
-
Support for splitting compiled translations into dynamically loadable modules.